It’s pretty well established that if you go overboard from a sailboat in the middle of the ocean during a storm at night, it’s game over.
My solution is to make sure that no one goes overboard.
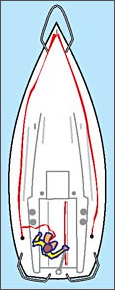
That means we have to be secured to the boat by some means. Jack lines run from the bow to the stern (for the most part) on starboard and port sides. (Image from West Marine’s website) The red lines are the jack lines.
Safety tethers attach one’s harness to a jack line.
Not including harnesses, 2 jack lines and 2 tethers were going to cost well over $400. And the tethers weren’t even exactly what I was looking for. I resolved that I could make my own.
The materials, including shipping, cost $219.
Some reading on line revealed that the safety tether shackle that attaches to the harness should be a quick release type that can be opened with one hand while the shackle is under load. I still have to add a pull string to the shackle. It will consist of a length of line with some beads that will make it easy to recognize and grab by touch alone.
ORC/ISAF guidelines tell me that everything should have a breaking strength of at least 4,500 lbf. I don’t think my body could survive a load of 4,500 pounds being put on it, but I suppose this ensures that the safety equipment is definitely not going to break. So . .
Here’s what I got:
Lewmar Snap Shackle 29927240 – qty 2 @ $32.29 each.
Spinlock Safety Line Clip DW-STR/CLIP – qty 2 @ $26.10 each.
Marlow 25mm Polyester Jack Line Webbing – 80 feet @ $1 per foot.
Samson Amsteel Blue 1/4″ Dyneema Line – 10 feet @ $1.29 per foot (I had this leftover from the life line installation).
I could find no strength specifications on the Spinlock clip, but they use the clip on tethers that they say meet the ORC/ISAF guidelines. That should mean that the clip is good enough.
The beautiful thing about the Amsteel line is that it is SUPER easy to splice. Literally. You basically take a length of line, run it inside itself, pull it all tight, and then sew in a lock stitching.
Here are the tethers all finished. Each one is approximately 3 feet long from hook to snap. This doesn’t give a huge range of movement, but hopefully, if someone does go over, it keeps them high enough out of the water that they can possibly get a leg over a toe rail and an arm on a life line to pull themselves back up. And at that the very least it will keep their head OUT of the water as they are dragged along side Emet so they won’t drown. Emet doesn’t have a huge amount of freeboard and I only tested by attaching the clip to a jack line and then stepping off Emet and laying on the dock.
We had some . . . ahem . . . issues getting the sewing machine to work correctly sewing the webbing with V92 thread. Jodi finally gave up and told me to take a seat and try it out. I can only say that the tension setting is of paramount importance. We knew this, but didn’t know exactly what to set it at. Sometimes, with one setting, it would work, then suddenly it wouldn’t. It was a lot of sewing, ripping, sewing, ripping, sewing, ripping with some stitch settings changed in the middle. Of course, when I was just about done, I figured out what the setting was to get it to work each time I sewed in forward and reverse. The correct tension setting was 7. Mind you that’s for the Singer 4411. If I recall correctly, we had the stitch length set to 3 and the width set to 3 as well. There are no pictures of the bird’s nest of thread that sometimes happened on the back side of the stitches.
The loops are sewn in so that we can attach one end to a cleat or pad eye with a shackle.
I’m happy with how everything turned out. We’ll see if I’m as happy if any of it gets put to the test.


